| [ < ] | [ > ] | [ << ] | [ Up ] | [ >> ] | [Top] | [Contents] | [Index] | [ ? ] |
... It is very, very simple!
|
openEyA-webcam in modality "lite" do not need any extra hardware.
For the modality ’Webcam’, plug in first the USB Webcam (Linux compatible, UVC Driver)
and then launch openEyA (see section Start Up). Proceed further as indicated next.
| 5.1 Setup | ||
| 5.2 Recording | ||
| 5.3 Processing | ||
| 5.4 Recording Info: XML Output |
| [ < ] | [ > ] | [ << ] | [ Up ] | [ >> ] | [Top] | [Contents] | [Index] | [ ? ] |
| 5.1.1 General Settings | ||
| 5.1.2 Video Test | ||
| 5.1.3 Slide Preview | ||
| 5.1.4 Audio Gains | ||
| 5.1.5 Panel Configuration Save/Load |
The openEyA-webcam Graphics User Interface (GUI) is shown in Fig.3.
It allows to configure (and preview), to record and to post-process (i.e.,
automatically synchronize audio-video and slides taken from your own computer
a through a USB webcam (e.g., HD).
To start click on the big openEyA logo in green.
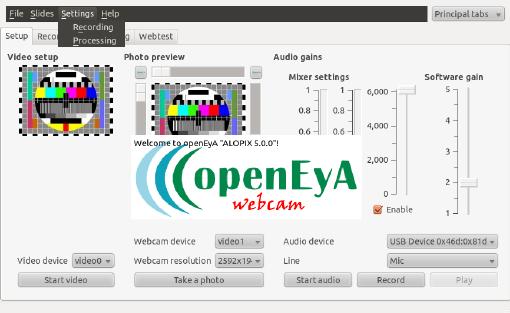
Fig.3: openEyA-webcam GUI
| [ < ] | [ > ] | [ << ] | [ Up ] | [ >> ] | [Top] | [Contents] | [Index] | [ ? ] |
By selecting ’Settings’ from one of the upper links in the GUI (Fig.3), it is possible
to (i) select the ’Input/Ouput’ recording directories and (ii) select a
timing for the photos/slides. The default directory is user’s Desktop
for the stored recordings and a deafult value of 15 sec for taking photos as shown in Fig.4.
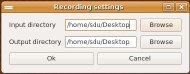
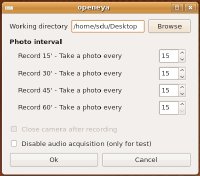
Fig.4: openEyA general settings
| [ < ] | [ > ] | [ << ] | [ Up ] | [ >> ] | [Top] | [Contents] | [Index] | [ ? ] |
Select ’Video device’ (usually ’video0’ or ’video1)’ depending if your are using
your computer’s webcam or an external USB webcam (with Linux UVC Driver).
Click ’Start video’ to test and see the video image and positionate the webcam.
| [ < ] | [ > ] | [ << ] | [ Up ] | [ >> ] | [Top] | [Contents] | [Index] | [ ? ] |
Click ’Take a photo’ to test, get a picture or capture!
Wait some seconds until every taken image appears in the Photo preview!
When using an external (HD-)Webcam, with ’Take a photo’ you can re-positionate the webcam
if needed).
You may also want to crop the pictures by selecting an area within the
Photo preview windows in Fig.5. This allows to save disk space
when processing the synchronized audio-video-slides openEyA files. Duplicated photos,
or photos that have slighltly changed, are automatically discarded by openEyA
during the ’Processing’ (see section Processing). Another feature of openEyA is that
all photos taken can also be easily straighten out (see section Photo Straightening/Reprocess) and
synchronized to the corresponding audio-video recordings.
It is also possible to select the location of the openEyA logo defult to appear
in the recordings (from the Photo Preview corners in Figs. 4 or 5). When photos are
straighten out, this logo can be cleaned out.
| [ < ] | [ > ] | [ << ] | [ Up ] | [ >> ] | [Top] | [Contents] | [Index] | [ ? ] |
To test the audio quality, select first ’Enable’ and click ’Start audio’
to check the correct audio level (see Fig.5).
Select then ’Audio device’ or in-’Line’ depending if your are using
your computer’s Microphone or an external USB omni-directional Microphone.
Check also parameters such as Capture, … to optimize the audio quality.
After all these parameters have been set, it is possible to make a recording test of few secs
(the small windows appears when pressing Record of Fig.5)
and to Play it to listen the audio quality.
Try several brief audio recordings to adjust the Software Gain.
Fig.5: openEyA video, photo, audio setup example
| [ < ] | [ > ] | [ << ] | [ Up ] | [ >> ] | [Top] | [Contents] | [Index] | [ ? ] |
Similarly to the Set of Alarms, the Panel Configuration set for the audio, video and slides
can be re-used for different occasions by simply saving them into a file and then loading them
back into the openEyA control panel! Open the File menu and simply click
’save or load config’.
| [ < ] | [ > ] | [ << ] | [ Up ] | [ >> ] | [Top] | [Contents] | [Index] | [ ? ] |
Within the Recording GUI shown in Fig.6, it is possible
to start an ’Immmediate recording’ or to program recording(s)
by selecting the ’Alarms’ options (it is also possible
to load in saved Alarms).
Immmediate recording’Press ’Start’ and select the time lag in minutes to activate the recodings
(using the Setup of previous sections). openEyA allows to record
slots of 15 up to 90 minutes continuously and automatically. A ’Beep’ sound
is issued on Stop or completion of an Immediate recording. If you need
to record for longer periods then you can set the ’Alarms’.
Alarms’Select this option, to program future automated recordings of up to one hour maximum each.
You can Add, Modify, Delete alarms to build on a given schedule of recordings.
Set of Alarms can be re-used for different occasions by simply
saving them into a file and then loading them into the openEyA control panel!
Open the File menu and simply click ’save or load alarms’.
The ’Current time’ level indicates to time left (or, alternatively, the time passed)
to complete the recording.
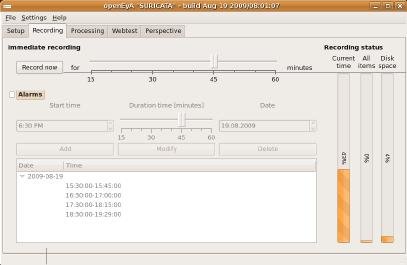
Fig.6: Example of Immmediate recording (45 mins)
| [ < ] | [ > ] | [ << ] | [ Up ] | [ >> ] | [Top] | [Contents] | [Index] | [ ? ] |
Within the Processing GUI in Fig.7, it is possible
to start processing the synchronization of audio, video and photos taken
during the recording session(s).
As in the figure, you need to select first the ’Input/output’(s)
files from the list of available recordings carried out so far.
| 5.3.1 Create Output Zip File | ||
| 5.3.2 Process ALL Recordings Later | ||
| 5.3.3 Create Keywords from Slides (OCR) |
| [ < ] | [ > ] | [ << ] | [ Up ] | [ >> ] | [Top] | [Contents] | [Index] | [ ? ] |
You can also ’Create output Zip file’ to backup your data or to
display your openEyA recordings on a dedicated webserver
(just copy and unzip the file and make a link to the ’index.html’ file).
The original pre-processed recordings are saved as zip file (with a ’_orig.zip’
extention) in the recording directory.
| [ < ] | [ > ] | [ << ] | [ Up ] | [ >> ] | [Top] | [Contents] | [Index] | [ ? ] |
From within the Processing GUI of openEyA it is possible to select
’Process ALL recordings later at’ by indicating a time schedule in order
to initiate the process a-posteriori. This feature is particularly useful
when recording many hours one after the other (as for example during a Conference)
so that you could program openEyA to carry out the processing in one go late
at night.
| [ < ] | [ > ] | [ << ] | [ Up ] | [ >> ] | [Top] | [Contents] | [Index] | [ ? ] |
You can also ’create keywords from slides’. This is done by openEyA via
Tesseact OCR -one of the most accurate open source Optical Character Recognition engines available.
When selecting this option from the processing,
an ascii file is created in the directory of the recording named ’ocr.txt’ that contains all
extracted text from the slides (you can then use this file to create a "Cloud Tag" or use some of them
as Keywords. The process with create keywords from slides needs longer time to complete
the extraction.
The Processing status is indicated in the GUI in Fig.7.
Wait until it completes (100 percent)!.
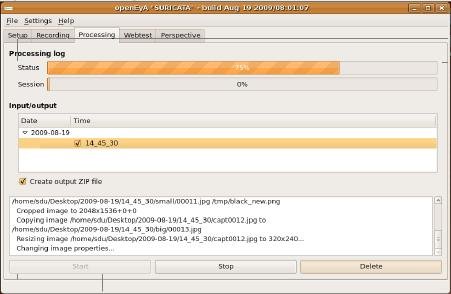
Fig.7: Example of Processing the selected recording
| [ < ] | [ > ] | [ << ] | [ Up ] | [ >> ] | [Top] | [Contents] | [Index] | [ ? ] |
It is possible to attach labels and information to (previous) recordings already
processed. You can also ’Create output Zip file’ with this labelled multimedia data.
Select from the openEyA GUI (inside ’Principal Tabs’ shown in Fig.3)
the ’Advanced tabs’ tag.
The added information can be found within the file ’info.xml’ in the directory of the recording
being labelled. This XML file can be used (linked) directly within any Content Management System (CMS)
for e-Learning to describe the recording; these recordings info can be also found within the pure
text file: ’info.txt’, and the Title will appear in the main ’index.html’ document
for the recording.
These ’info’ files can contain inputs:
|
| [ << ] | [ >> ] | [Top] | [Contents] | [Index] | [ ? ] |
This document was generated by sdu on March 28, 2011 using texi2html 1.82.